
We may earn from vendors via affiliate links or sponsorships. This might affect product placement on our site, but not the content of our reviews. See our Terms of Use for details.
FTP was the popular protocol for file transfer but short of using FTPS, it doesn't provide the security required these days. Here's how to use Secure Copy (SCP) for file transfer.
Secure copy, or SCP, based on the BSD RPC protocol, is not secure in itself. The security of SCP comes from the use of Secure Shell (SSH) for its transport and authentication. In the past, TELNET was used for remote connectivity, but it’s clear text. Today the recommended method is SSH. By combining the security of SSH with the functionality of the BSD RPC protocol, you get, at a very high level, SCP. With SCP you can upload files to a destination device and include file attributes such as permissions and timestamps. From a networking perspective, you will need to ensure TCP port 22 is able to traverse the network.
There is an SCP application that runs on a host. Some operating systems have SCP installed by default and others will require you to install a third party application to use SCP. In this example, I’ll demonstrate with an SCP installation on AWS. To use AWS for testing in your lab, open the Amazon EC2 console. From the console dashboard, choose Launch Instance. You can find detailed instructions on how to do this in the article: How to create and destroy an Amazon Machine Image (AMI).
In the next section we will upload a file to our server on AWS using SCP.
The command syntax for upload is as follows:
scp SourceFile user@host:directory/TargetFile
When dealing with AWS, there’s an additional bit of information we need to add. In this case it’s our secret key that we’ve created and downloaded when we created the instance. The syntax to include the secret key is as follows:
scp -i SourceFile user@host:directory/TargetFile
Let’s upload a file to the server.
First I’ll view a local file called mytextfile.txt so you can see that there’s a bit of text there. Next I’ll use the SCP command to put that file on the AWS server.
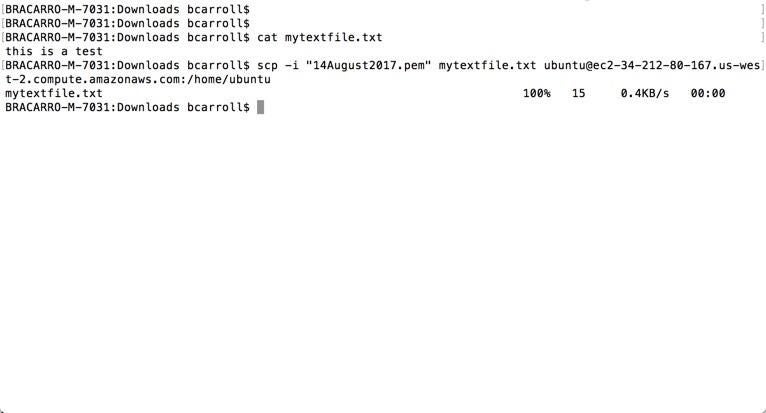
Next let’s go over to AWS and see if the file is there. We can cat the file to make sure it has the same contents.

Uploading, as you can see, is very simple. Next let’s pull a file off of our AWS server.
The command syntax for download is as follows:
scp user@host:directory/SourceFile /LocalDirectory/TargetFile
Again, since we are using AWS, we need to add our secret key into the mix like this:
scp -i user@host:directory/SourceFile /LocalDirectory/TargetFile
Let’s download our previously uploaded file and give it a new name when we pull it back down.
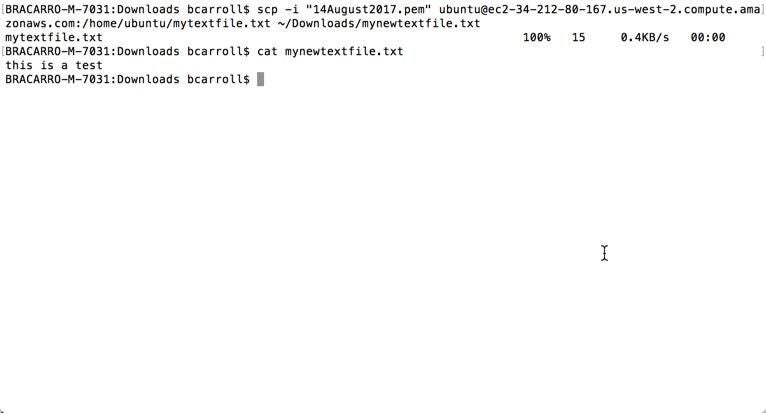
In our output we can see that we first downloaded the file from our AWS server and saved it with the new name mynewtextfile.txt. The cat shows the contents of the original file. Again, downloading using SCP, just like uploading, is easy.
All things considered, we have only touched the surface of using SCP for file transfer in this article. However, many networking devices support SCP, especially with the use of Linux as the base OS. For example, Cumulus Linux as well as the Aruba OS-CX would both support SCP, although Aruba doesn’t intend on end users using that feature. The point is that it works and at times comes in very handy. In fact, you’ll find several vendors who use SCP in their upgrade process for example, when patching Cisco ISE. Knowing how to work with SCP is a handy tool for a network admin’s toolkit.
From the hottest programming languages to commentary on the Linux OS, get the developer and open source news and tips you need to know. Delivered Tuesdays and Thursdays
From the hottest programming languages to commentary on the Linux OS, get the developer and open source news and tips you need to know. Delivered Tuesdays and Thursdays
Share ArticleBrandon Carroll has been in the industry since the late 90s specializing in data networking and network security in the enterprise and data center. Brandon holds the CCIE in security and is a published author in network security.